DIY Veggie Garden Arch - How to Make a Garden Arch Using Reo Mesh (Reinforcing Mesh)
You know those dreamy garden arches that you often find browsing Pinterest? I’ve always wanted to make my own DIY garden arches but could never figure out how to do it until last year during lockdown when I finally had the time to research, plan and figure it out. Today I’m excited to share exactly how I did them!
It took a long time to figure out exactly what materials to use, where to buy them, how to get them home, how to cut it to size etc. I did so much research before I got started but once I figured it out everything that followed is easy. So I’m here to share so you can do it too!
Before we begin..

WHY USE A GARDEN ARCH TO GROW VEGGIES?
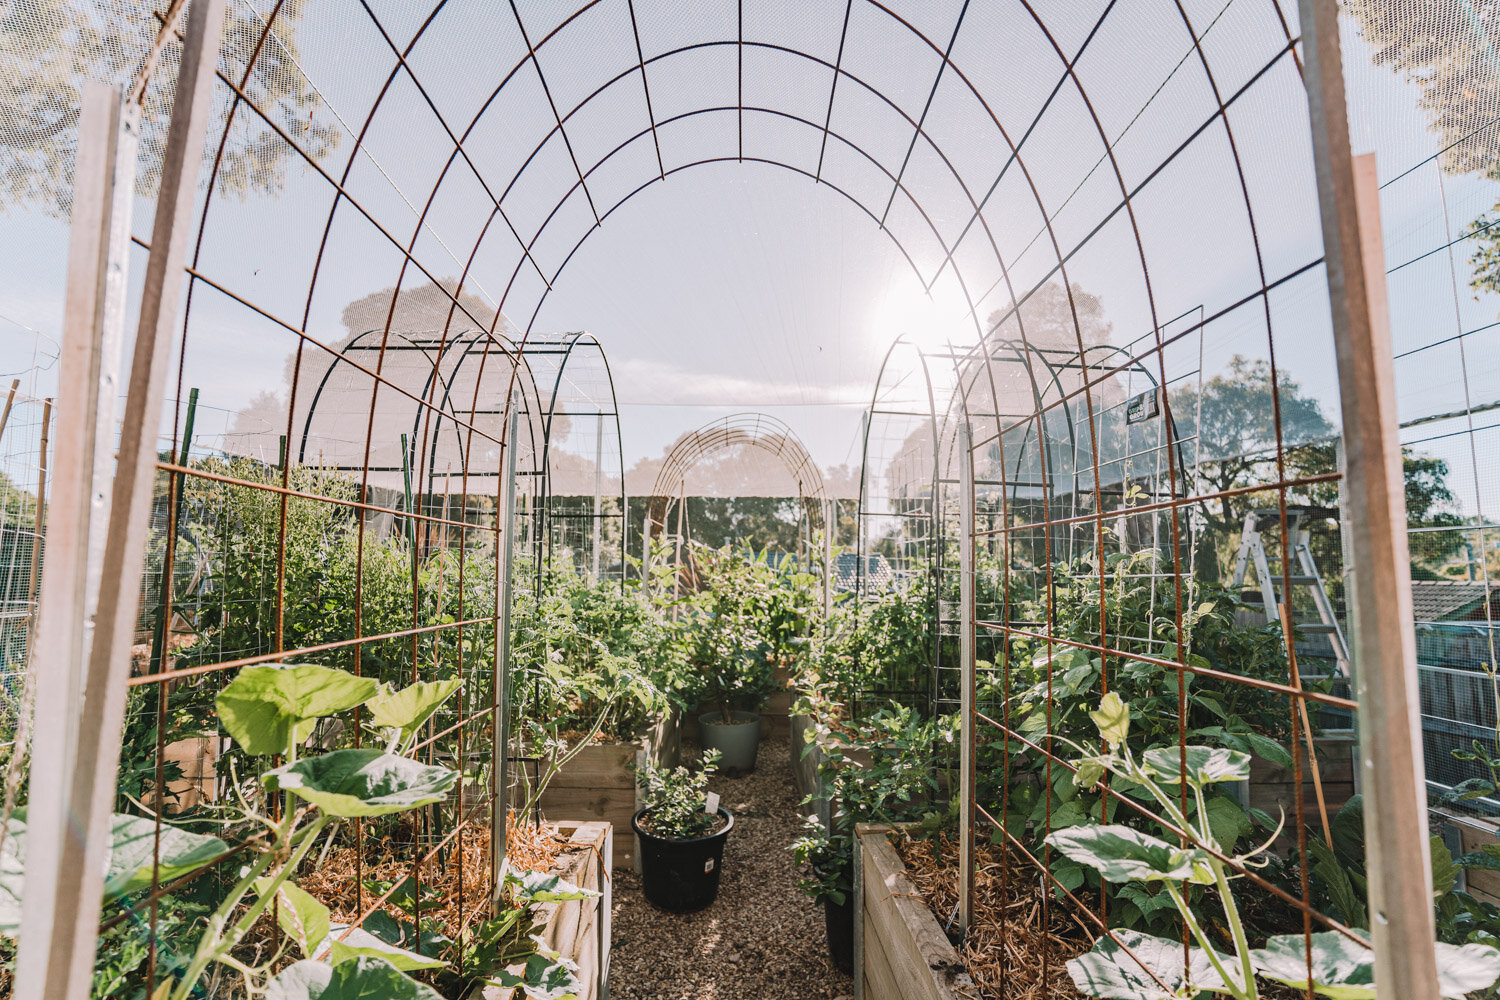
I’ve always loved having the idea of arches in our veggie garden. Aside from the fact that they are a beautiful feature in the garden, they’re actually really functional too! Garden arches bring veggie growing upwards and makes the most of all the vertical space that is otherwise wasted. When using garden arches, you can save so much garden space by training your veggies upwards, leaving more surface area in your veggie beds for other plants. If you calculate the surface area of a garden arch, you will see how much space you can get just by growing up.

WHAT TO BUY?
I’m sure you’ve seen pictures of garden arches all over Pinterest and the Internet but perhaps like me, you have always wondered exactly what that square gridded thing is called. The magical item in question that you need to get your hands on to make your own garden arch is concrete reinforcing mesh panels, also commonly known as reo mesh or reo panels. Reo mesh comes in a variety of sizes both large and small but the size you are looking for is one that is at least 5 metres (yes!) in length and in whatever width you want your arch to be. The pieces I used were 2.4 m x 6 m in size.
You will also need :
4 x 1.8 m tall star posts / steel fence posts per arch that you create
angle grinder if you’re cutting it yourself
stake driver (optional) + hammer
2 people (including you!) to manoeuvre and bend the arch
WHAT SIZE TO BUY?
Reo mesh typically is made out of squares that are 20cm in size - so in terms of the size of the grids, 20cm is generally the standard size you will get for this. But what differs is the thickness of the mesh panels. When shopping you will see that reo mesh comes in varying thicknesses. This will usually be noted in the product name with numbers 62, 72, 82 etc to denote mesh that’s 62mm thick, 72mm thick and so on.
After doing some research and asking around, it seems that 82mm thick mesh is best for making garden arches. 82mm reo mesh is on the thicker side compared to say a 62mm reo mesh and I was personally pretty worried that it would be too thick to bend, which is what stopped me from going ahead with this DIY for ages as I didn’t want to order in some huge panel only for it to be too rigid to use! But I assure you it’s more than fine to work with and exactly the thickness you need.


WHERE TO BUY REO MESH & HOW TO GET IT HOME?
Now if you’re going to be buying a panel 6 metres in length well yes, that is going to be very very large. So if you’re an urban dweller like me, how are you meant to buy such a thing, let alone bring it home? This was probably my second road block when it came to progressing with this project. It seems that most of the people I saw online making garden arches like these were often doing this on farm properties etc and owned their own utes or whatever and would shop for similar panels from rural farm supply stores & then drive their own 6 metre panels home. But I ain’t got anything like that!
Well it turns out, you can indeed buy reo mesh in urban cities too! Check out garden & building supply companies near you - there are various companies around Melbourne depending on where you live that sell reo mesh panels and will also be happy to
Deliver them to you at a cost
Possibly even cut them to size if you don’t have an angle grinder
All you have to do is call up and ask + make sure you have somewhere to store your reo mesh panel (of 6 metres~ length) like a carport.

working out The SIZEs you need
Once you get your reo mesh panel delivered on your property, you will need to work out your measurements and get it cut to size. If you have an angle grinder, then you can easily cut the panel yourself at home giving you more freedom to figure out exactly what size you need after you see your reo mesh panel in person. If you don’t have an angle grinder, then you can see if the company you’re purchasing from can cut if for you. A few that I called offered to cut straight lines for $10 a cut but we ended up cutting it ourselves so that I could see the panel in person and plan out exactly how I wanted to use it.
Our reo mesh panel was 2.4 metres wide which meant it was perfect for slicing into two so that we could create 2 arches around 1 metre in width. Note when you cut your panels you lose about 20cm with each cut due to the gridding & you’ll want to cut the entire length that’s sticking out off.
Now the more difficult measurement is figuring out how long your panel is. This will involve some maths.
First, calculate how high you want your arch from the ground. We already had existing arches in our garden (pre-made ones from Bunnings) which were around 2.4 metres in height which worked well so we decided to make our reo mesh garden arches the same height so that they would look cohesive in the garden together.
Next, calculate how wide you want your arch to sit. For us, our garden beds were around 1 metres apart but taking into account our thick sleepers, it meant that our arch would be around 1.2 metres in width.
Using your length and width measurements, draw a diagram similar below and assume the top of the arch is a semi-circle. The radius of your semi circle on top is half the width of the arch. Using this figure, calculate the circumference of the circle and divide by 2 to get measurement for the top of the semi circle (1.9metres). Then, substract the radius (0.6m) of the circle from the total height (2.4m) of the arch to get the length of the straight sides. Add together (1.8 + 1.9 + 1.8m = 5.5m) to get the length you need your reo panel to be.
BUT WAIT: If you’re putting your arch in raised garden beds like me, you can then go ahead and subtract the height of the garden bed (minus say 10cm overlap) as there’s no need to bury the arch all the way into the bed.
Hence for us to create an arch that was 2.4m high from ground level, but sat in raised beds 60cm in height, we needed 4.5 metres length of reo mesh. So from our 2.4 x 6m reo panel, we cut 2 pieces that were 1 x 4.5 m in size. The leftover pieces we kept so that we can use them as smaller trellises around the garden (bonus!)


CREATING YOUR garden ARCH
Once you have your reo mesh panels cut to size, it’s time to make your garden arch!
1. Get your four star pickets the same distance apart as the width of your arch. Hammer them into the soil so that they are secure. These are what will be holding your arch up so make sure they’re secure in the soil. If needed, you can use a stake driver and hammer to make sure they’re extra secure.
2. Next, get one of your reo panels into your patch. The most difficult part is probably manouvering it around and down narrow areas or footpaths in an urban garden as it will still be a big panel. Try not to bend the panel when moving but if you really absolutely have to bend the panel when moving it to its location, make sure not to bend the arch anywhere but in the middle as once you bend it, it kind of stays bent in that spot.
3. Once your arch is in its location, bring the two sides together evenly by walking it in (you will need two people to do this - and it’s not difficult at all - you don’t really need to be very strong to do this) so that a gentle bend is created towards the centre on top. Tuck the ends around 10cm into the soil to hide them then secure the panel onto the posts using galvanised wire tie. Don’t use plastic ties as this probably won’t be strong enough.
Tadaaa!!! A garden arch is made!


WHAT TO GROW VERTICALLY ON YOUR NEW GARDEN ARCH?
The amazing thing about garden arches constructed out of reo mesh is that they’re rather sturdy and strong. They provide the perfect foundation for trailing pumpkins and squashes. This is what we’ve allocated our new garden arch space to this year! You can also of course grow any other vines such as melons, cucumbers, beans or indeterminate tomatoes.
Or how about arches from two dedicated planter boxes housing bramble berries!
The options are endless and having more vertical space in the form of a garden arch really increases the productivity of your garden! I hope you found this post helpful - happy gardening!
